NET-SNMPパッケージをインストールする
# yum install net-snmp
NET-SNMPの設定を行う。
# vi /etc/snmp/snmpd.conf

#com2sec notConfigUser  default       public <-コメントアウト
com2sec local localhost private <-追加
com2sec mynetwork 192.100.100.0/24 public <-追加


#view    systemview    included   .1.3.6.1.2.1.1 <-コメントアウト
#view    systemview    included   .1.3.6.1.2.1.25.1.1 <-コメントアウト
view all included .1 80 <-追加

#group   notConfigGroup v1           notConfigUser<-コメントアウト
#group   notConfigGroup v2c           notConfigUser<-コメントアウト
group MyROGroup v1 mynetwork<-追加
group MyROGroup v2c mynetwork<-追加


↓コメントアウト
#access  notConfigGroup ""  any  noauth  exact  systemview none none
access MyROGroup "" any noauth exact all none none <-追加
access MyRWGroup "" any noauth exact all all none <-追加

disk / 10000 <-コメント外す
snmpdの起動と、自動起動設定。
# /etc/rc.d/init.d/snmpd start
snmpd を起動中:                                            [  OK  ]
# chkconfig snmpd on
MRGTパッケージをインストールする
# yum install mrtg
MRTGの設定を行う
設定ファイルの作成
# cfgmaker --ifref=descr --ifdesc=descr public@192.100.100.50 >
 /etc/mrtg/mrtg.cfg
mrtg.cfg を編集
# vi /etc/mrtg/mrtg.cfg

# WorkDir: /home/http/mrtg
WorkDir: /home/user/public_html/mrtg <- mrtgフォルダの設定
              (今回はユーザフォルダに置くことにする)
# Options[_]: growright, bits
Options[_]: growright, noinfo <- グラフの時間軸を左から右へ設定する

Language:eucjp <-追加


### Interface 2 >>...
TargetからPageTopまでの値 "[192.100.100.50_eth0]" をすべて
 "[eth0]" に修正する。
<table>から</table>までの値(<table>タグ含む)をすべて削除する


最終行に下記値を追加する

### CPU Load Average ###
Target[cpu]: .1.3.6.1.4.1.2021.10.1.5.1&.1.3.6.1.4.1.2021.10.1.5.2:
MaxBytes[cpu]: 100
Unscaled[cpu]: dwmy
Options[cpu]: gauge, absolute, growright, noinfo, nopercent
YLegend[cpu]: CPU Load(%)
ShortLegend[cpu]: (%)
LegendI[cpu]: 1分間平均
LegendO[cpu]: 5分間平均
Legend1[cpu]: 1分間平均(%)
Legend2[cpu]: 5分間平均(%)
Title[cpu]: CPU Load Average
PageTop[cpu]: <H1>CPU Load Average</H1>


### Memory Free ####
Target[mem]: .1.3.6.1.4.1.2021.4.6.0&.1.3.6.1.4.1.2021.4.4.0:
MaxBytes1[mem]: 4010280
MaxBytes2[mem]: 6242296
Unscaled[mem]: dwmy
Options[mem]: gauge, absolute, growright, noinfo
YLegend[mem]: Mem Free(Bytes)
ShortLegend[mem]: Bytes
kilo[mem]: 1024
kMG[mem]: k,M,G,T,P
LegendI[mem]: Real
LegendO[mem]: Swap
Legend1[mem]: 空き物理メモリ[MBytes]
Legend2[mem]: 空きスワップメモリ[MBytes]
Title[mem]: Memory Free
PageTop[mem]: <H1>Memory Free</H1>


### Disk Used ####
Target[disk]: .1.3.6.1.4.1.2021.9.1.9.1&.1.3.6.1.4.1.2021.9.1.9.1:
MaxBytes[disk]: 100
Unscaled[disk]: dwmy
Options[disk]: gauge, absolute, growright, nopercent, noinfo
YLegend[disk]: Disk Used(%)
ShortLegend[disk]: (%)
LegendI[disk]: / Disk used
LegendO[disk]: / Disk Used
Legend1[disk]: / Disk used
Legend2[disk]: / Disk used
Title[disk]: Disk Used
PageTop[disk]: <H1>Disk Used</H1>


### CPU Temperature ####
Target[cputemp]: `/usr/bin/sensors | grep 'Core' |
 awk '{print $3}' | sed -e 's/+//' -e 's/[^0-9+\.].*//'`
MaxBytes[cputemp]: 100
Title[cputemp]: CPU Temperature
PageTop[cputemp]: <H1>CPU Temperature</H1>
Options[cputemp]: growright,absolute,gauge,nopercent,noinfo
WithPeak[cputemp]: ymw
unscaled[cputemp]: dwmy
YLegend[cputemp]: Temperature
ShortLegend[cputemp]: C
LegendI[cputemp]: Core 0
LegendO[cputemp]: Core 1
Legend1[cputemp]: Core 0
Legend2[cputemp]: Core 1


### M/B Temperature ####
Target[mbtemp]: `/usr/bin/sensors | grep 'temp1' |
 awk '{print $2}{print $2}' | sed -e 's/+//' -e 's/[^0-9+\.].*//'`
MaxBytes[mbtemp]: 100
Title[mbtemp]: M/B Temperature
PageTop[mbtemp]: <H1>M/B Temperature</H1>
Options[mbtemp]: growright,absolute,gauge,nopercent,noinfo
WithPeak[mbtemp]: ymw
unscaled[mbtemp]: dwmy
YLegend[mbtemp]: Temperature
ShortLegend[mbtemp]: C
LegendI[mbtemp]: Temp
LegendO[mbtemp]: Temp
Legend1[mbtemp]: M/B Temp
Legend2[mbtemp]: M/B Temp
前回 lm_sensors でCPU温度が取得できるようになった、今回は取得した温度をログに記録する。
lm_sensors を実行すると、下記のように表示される。
# sensors

acpitz-virtual-0
Adapter: Virtual device
temp1:       +54.0°C  (crit = +104.0°C)

coretemp-isa-0000
Adapter: ISA adapter
Core 0:      +22.0°C  (high = +80.0°C, crit = +100.0°C)
Core 1:      +23.0°C  (high = +80.0°C, crit = +100.0°C)
下記コマンドオプションを加えることで、温度(数値)だけ表示させることができる。
# /usr/bin/sensors | grep 'Core' |
 awk '{print $3}' | sed -e 's/+//' -e 's/[^0-9+\.].*//'
22.0
23.0
M/B(Chipset)温度は、下記で取得。
# /usr/bin/sensors | grep 'temp1' |
 awk '{print $2}{print $2}' | sed -e 's/+//' -e 's/[^0-9+\.].*//'
54.0
54.0
M/Bの温度取得については、MRTGの入力は2系統であるので、printで同じ値を2度出力している。
メモリーについては、freeコマンドで、メモリーとスワップの最大容量を確認して、それぞれ値を設定する。
# free
             total    used     free   shared  buffers   cached
Mem:       4010280  231876  3778404        0    12204   142772
-/+ buffers/cache:   76900  3933380
Swap:      6242296       0  6242296
保存したら、設定ファイルの文字コードをEUCに変換する。
設定ファイルのバックアップ
# cp /etc/mrtg/mrtg.cfg /etc/mrtg/mrtg.cfg.org

nkfでコードをEUCに変換
# nkf -e /etc/mrtg/mrtg.cfg.org > /etc/mrtg/mrtg.cfg
なお、nkfがインストールされてない場合は、nkfパッケージをインストール。
# yum install nkf
MRTGの起動スクリプトを作っておく
# vi mrtg.sh

#!/bin/bash

LOCK=/var/lock/mrtg/mrtg_l
CONFCACHE=/var/lib/mrtg/mrtg.ok

export LANG=ja_JP.eucJP
mrtg /etc/mrtg/mrtg.cfg --lock-file $LOCK --confcache-file $CONFCACHE
# chmod 700 mrtg.sh <- 権限の付加外部からアクセスできるように許可をする
# vi /etc/httpd/conf.d/mrtg.conf

#Alias /mrtg /var/www/mrtg
Alias /mrtg /home/user/public_html/mrtg <- 変更する

<Location /mrtg>
    Order deny,allow
    Deny from all
    Allow from All <-追加
    #Allow from 127.0.0.1
    Allow from ::1
    # Allow from .example.com
</Location>
設定の反映
# /etc/rc.d/init.d/httpd restart
httpd を停止中:                                            [  OK  ]
httpd を起動中:                                            [  OK  ]
とりあえずALLとして、アクセス制御は .htaccess で行えばよい。
crondが起動していない場合は、起動または再起動させる。
# service crond restart
crond を停止中:                                            [  OK  ]
crond を起動中:                                            [  OK  ]
動作確認
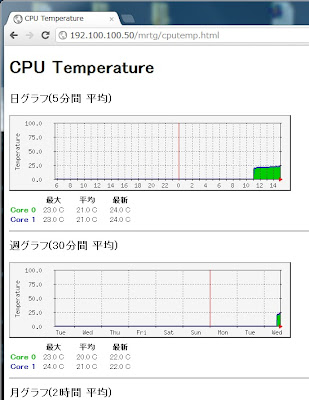
それぞれのグラフは [SeverIP]/mrtg/[label].html でアクセスできる。
たとえば、CPU温度であれば、http://192.100.100.50/mrtg/cputemp.html

0 件のコメント:
新しいコメントは書き込めません。