ラベル XS35V2 の投稿を表示しています。 すべての投稿を表示

2012年8月30日木曜日

Shuttle XS35V2、BIOSアップデートで自動電源投入が可能に


自宅サーバとして使用している日本Shuttle XS35V2。購入時は停電したときなどに、電源が自動復帰しない。最新のBIOSをアップデートすることにより、電源自動投入が可能に。

アップデートは簡単である、Shuttleのウェブページにツールも一緒にダウンロードできる。今回はDOSでのアップデートを行う、必要なものは下記。
  1. USBフロッピードライブ
  2. フロッピーディスク
  3. BIOSアップデートファイル
1.は近所のショップでは見かけなくなった。自分はコンプマートにて1700円で購入したが、いまも Amazon などで、送料込みでも2000円前後で購入可能。


2.もあまり見かけなくなったが、きっと専門店ならまだ置いているだろう。

3.はShuttleのウェブページよりダウンロード。

Shuttle XS35V2 BIOS のアップデート

まずは、最新のBIOSアップデートファイルをShuttleのウェブページからダウンロードする、現時点では「XS35V200.104」が最新。「1.Add "Restore on AC Power Loss" function.」と、自動電源投入の項目が書かれている。


ダウンロードしたファイルを解凍すると、3つのファイルが確認できる。


次に起動用FD(フロッピーディスク)を準備する、FDは起動用としてフォーマットしておく。このとき作成されるファイルで、"COMMAND.COM", "IO.SYS", "MSDOS.SYS" 以外のファイルは不要になるので削除。

この起動用FDの中に、さきほどダウンロードして3つのファイルをコピーする。


BIOSのアップデートを開始する前に、現在のBIOS設定状況(バージョン)を確認しておく。BIOSメニューは起動時に"Delete"でメニューが開く。
とくにSATAの設定などは、後々トラブルの原因になるので必ず確認。当方BIOSバージョンは、1.01、SATAのモードは、AHCIとなっている。


BIOSの設定で、USBを優先起動とし、さきほど作成したFDから起動、"FLASH.BAT" を実行する。
アップデートが完了すると自動で再起動する、かんたん簡単。


再起動後、BIOSメニューを起動。BIOSバージョンが上がっていることを確認する。


ほとんどの場合は、ここでBIOSがデフォルト値に戻っているが、マニュアルにそって念のためデフォルト値のロードを行う。


再起動後、再びBIOSメニューを開き、設定を書き換え前の値にする。


「Advanced」メニュー内に、"Restore on AC Power Loss" が追加されているので、値を "Power On" にする。これで停電時などに自動で電源が復帰するはずである。


BIOSを保存後に確認のため、一度電源を抜き挿ししてみる。
...無事起動、CentOSが起動しました。めでたしめでたし。


2012年7月29日日曜日

太陽電池とソーラーモーターでサーバを冷やす

このところ猛暑が続き、サーバのボード温度は73度まで上昇。ここまで上がるとさすがに無視できない。
SV35V2はファンレス仕様。本体ケースはメッシュになっており、放熱している。HDDではなくSSDで構築しているが、さすがに夏場は室内温度の上昇で、無理があるようだ。

前々から気になっていた工作用の太陽電池とソーラーモーターを使って、一番温度の上がる時間帯の温度を下げたい。

太陽電池は 1.5V 500mA のタイプを10枚、4枚直列 + 3枚直列 + 3枚直列を並列でつないだ。実は初めはそれほど枚数が必要になるとは思っていなかった。太陽電池の設置は家の中から西窓に向かって置く。太陽電池は1枚220円で購入。


初めの実験では、4枚直列を室内で試してみたが、しっかりと太陽光が当たらないと回らない。室内から太陽光が当たった状態で、電圧1.1V。電流は測れるテスターが手持ちにないので不明だが、かなり低い値になっているようだ。

ソーラーモーターはタミヤで中身はマブチのRF-500TBを使用しているようだ、0.5V 0.025A で回転数 380rpm、1.5V 0.03A で回転数 1280rpm で動作可能。通常のマブチモーターだと1.5V 0.5A ないと動作しないだろう。値段は745円とちょっと高い。


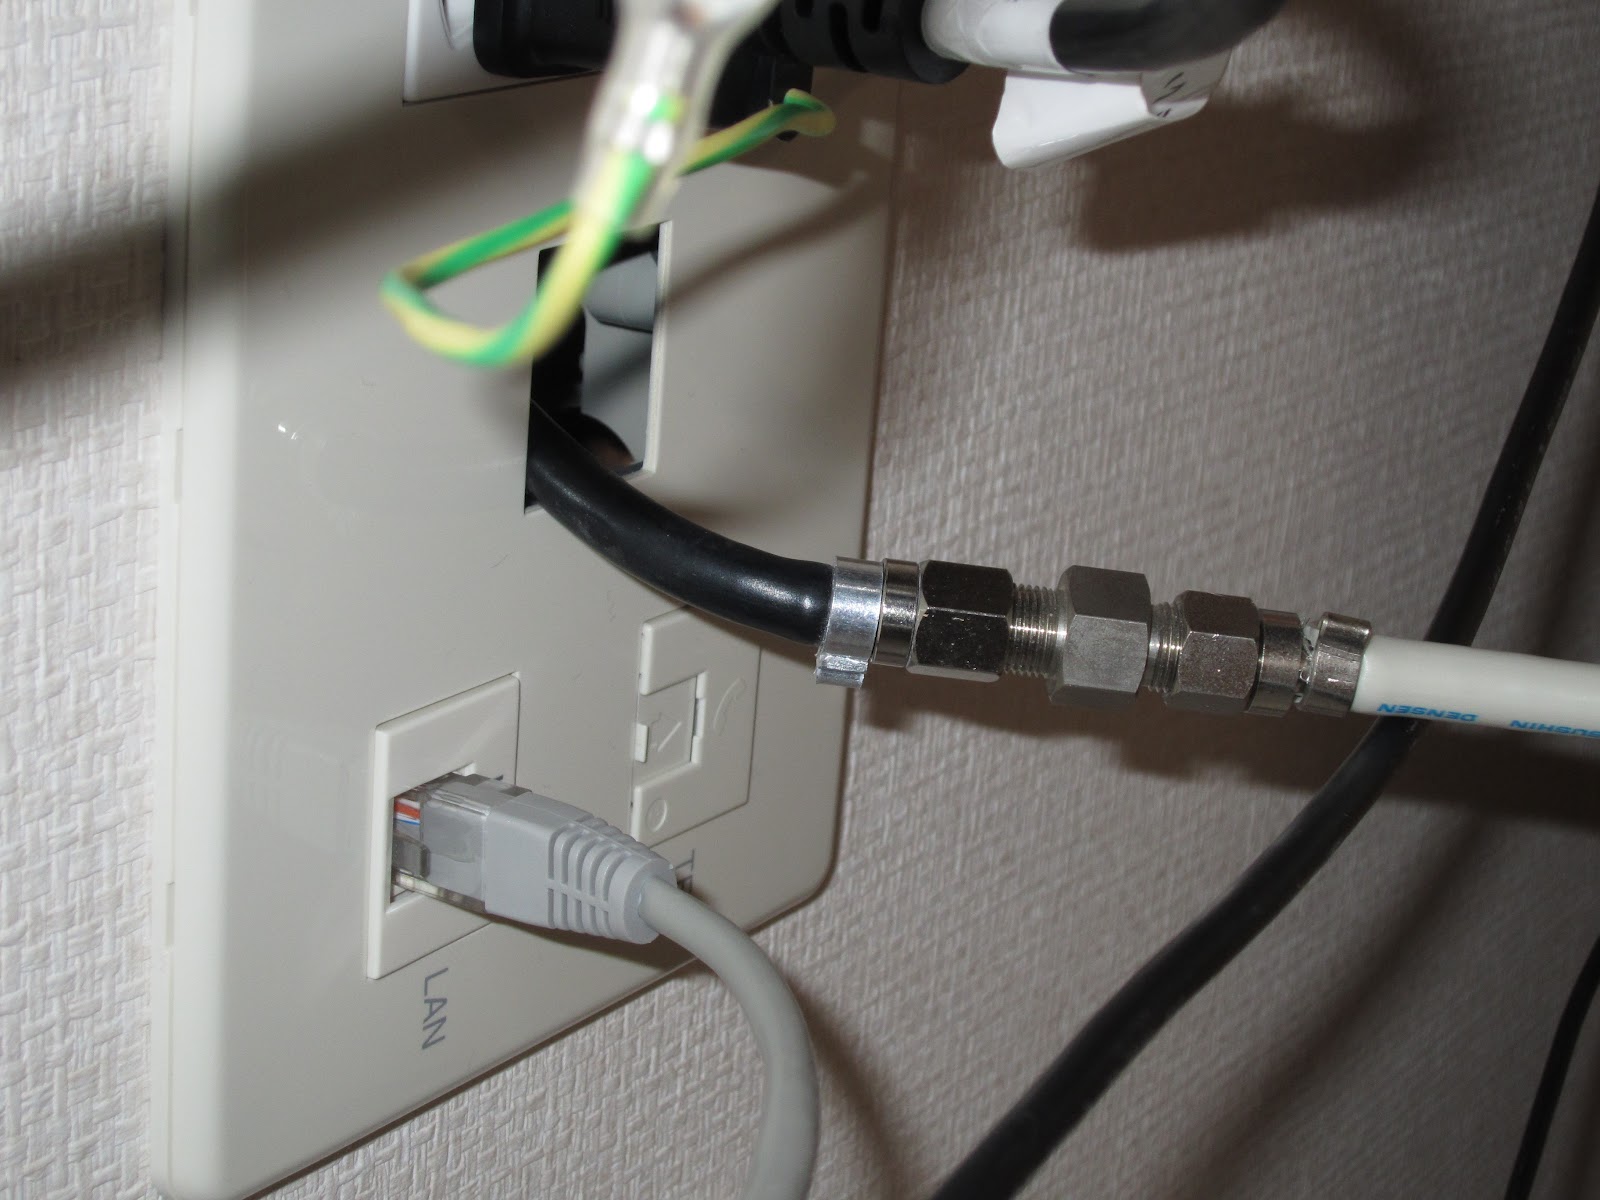
電源ケーブルは廃材を利用した、西側の部屋からサーバのあるウォークインクローゼットまでは、使用していないTVコンセント経由で送電する。直接接続して動作確認してから、TVコンセント経由でつないでみたのだが、動かない、、、。

すっかり忘れていたのがフィルタの存在。これがあるとTV側からの電圧がカットされる、CSやBSの衛星対応ジャックの場合は通電するようになっている。


フィルタを衛星対応に取り換えればいいのだが、太陽電池とソーラーモータで予算がなくなってしまったので、見た目は悪いがフィルタを外して直結した。どうせ机の裏側で見えないので気にならない。


モーターには8cmのプロペラ(52円)を取付、台座は3.5インチのFDDケース(いまとなってはめずらしいのかも)を使用した。


西日の当たる時間帯は、さすがに勢いよく回転している。さすがに10枚を3並列したおかげで、太陽があたらない朝8時台からゆっくりと回転し始める。西日の当たる時間なら、もう一台モーターを回せそうだ。あと、網戸を外せばさらに効率がいいだろう。


気になる温度は下のような結果に。

ボード温度は73度から10度ほどさがり、CPUは20度さがっている。小さなファン1つで効果は絶大、日差しが強いほど回転数が上がるので効率はいいけど、初期投資が高いのと、夜間はやはり温度が上昇(昼間ほどではないが)するので、やっぱりUSBファンのほうがいいのかな。

ちなみにUSBファンは1ヶ月間で30円ほどの電気料金。もとを取るには2台分(本体含む)で概算4年かかる計算。夏場だけファンを回すことを考えれば、やっぱりUSBファンのほうがいいのかも。今回は勉強代ということで。


2012年3月28日水曜日

MRTGでサーバ監視 indexmakerを使う

前回作成した各ページを、1つのページにおさめたい。
MRTGには予め付属のindexmakerというツールがある、これを使えば簡単にできてしまう。

indexmaker コマンドのパラメータに、mrtg.cfg と URLを下記の通り入力。
# indexmaker /etc/mrtg/mrtg.cfg > /home/user/public_html/mrtg/index.html


これだけで、index.htmlが作成される。ただ、文字コードがデフォルトで iso-8859-15 になっているので、これだけは手動で修正する必要がある。

# vi /home/user/public_html/mrtg/index.html


euc-jpに修正できたら、http://[SeverIP]/mrtg/ を開く。

2012年3月27日火曜日

NET-SNMP、lm_sensors、MRGTによる監視

NET-SNMPパッケージをインストールする


# yum install net-snmp


NET-SNMPの設定を行う。


# vi /etc/snmp/snmpd.conf

#com2sec notConfigUser default public <-コメントアウト
com2sec local localhost private <-追加
com2sec mynetwork 192.100.100.0/24 public <-追加
#view systemview included .1.3.6.1.2.1.1 <-コメントアウト #view systemview included .1.3.6.1.2.1.25.1.1 <-コメントアウト view all included .1 80 <-追加 #group notConfigGroup v1 notConfigUser<-コメントアウト #group notConfigGroup v2c notConfigUser<-コメントアウト group MyROGroup v1 mynetwork<-追加 group MyROGroup v2c mynetwork<-追加 ↓コメントアウト
#access notConfigGroup "" any noauth exact systemview none none
access MyROGroup "" any noauth exact all none none <-追加
access MyRWGroup "" any noauth exact all all none <-追加
disk / 10000 <-コメント外す


snmpdの起動と、自動起動設定。


# /etc/rc.d/init.d/snmpd start
snmpd を起動中: [ OK ]
# chkconfig snmpd on


MRGTパッケージをインストールする


# yum install mrtg


MRTGの設定を行う


設定ファイルの作成
# cfgmaker --ifref=descr --ifdesc=descr public@192.100.100.50 >
/etc/mrtg/mrtg.cfg


mrtg.cfg を編集
# vi /etc/mrtg/mrtg.cfg

# WorkDir: /home/http/mrtg
WorkDir: /home/user/public_html/mrtg <- mrtgフォルダの設定
              (今回はユーザフォルダに置くことにする)

# Options[_]: growright, bits
Options[_]: growright, noinfo <- グラフの時間軸を左から右へ設定する

Language:eucjp <-追加


### Interface 2 >>...
TargetからPageTopまでの値 "[192.100.100.50_eth0]" をすべて
"[eth0]" に修正する。
<table>から</table>までの値(<table>タグ含む)をすべて削除する


最終行に下記値を追加する

### CPU Load Average ###
Target[cpu]: .1.3.6.1.4.1.2021.10.1.5.1&.1.3.6.1.4.1.2021.10.1.5.2:
MaxBytes[cpu]: 100
Unscaled[cpu]: dwmy
Options[cpu]: gauge, absolute, growright, noinfo, nopercent
YLegend[cpu]: CPU Load(%)
ShortLegend[cpu]: (%)
LegendI[cpu]: 1分間平均
LegendO[cpu]: 5分間平均
Legend1[cpu]: 1分間平均(%)
Legend2[cpu]: 5分間平均(%)
Title[cpu]: CPU Load Average
PageTop[cpu]: <H1>CPU Load Average</H1>


### Memory Free ####
Target[mem]: .1.3.6.1.4.1.2021.4.6.0&.1.3.6.1.4.1.2021.4.4.0:
MaxBytes1[mem]: 4010280
MaxBytes2[mem]: 6242296
Unscaled[mem]: dwmy
Options[mem]: gauge, absolute, growright, noinfo
YLegend[mem]: Mem Free(Bytes)
ShortLegend[mem]: Bytes
kilo[mem]: 1024
kMG[mem]: k,M,G,T,P
LegendI[mem]: Real
LegendO[mem]: Swap
Legend1[mem]: 空き物理メモリ[MBytes]
Legend2[mem]: 空きスワップメモリ[MBytes]
Title[mem]: Memory Free
PageTop[mem]: <H1>Memory Free</H1>


### Disk Used ####
Target[disk]: .1.3.6.1.4.1.2021.9.1.9.1&.1.3.6.1.4.1.2021.9.1.9.1:
MaxBytes[disk]: 100
Unscaled[disk]: dwmy
Options[disk]: gauge, absolute, growright, nopercent, noinfo
YLegend[disk]: Disk Used(%)
ShortLegend[disk]: (%)
LegendI[disk]: / Disk used
LegendO[disk]: / Disk Used
Legend1[disk]: / Disk used
Legend2[disk]: / Disk used
Title[disk]: Disk Used
PageTop[disk]: <H1>Disk Used</H1>


### CPU Temperature ####
Target[cputemp]: `/usr/bin/sensors | grep 'Core' |
awk '{print $3}' | sed -e 's/+//' -e 's/[^0-9+\.].*//'`
MaxBytes[cputemp]: 100
Title[cputemp]: CPU Temperature
PageTop[cputemp]: <H1>CPU Temperature</H1>
Options[cputemp]: growright,absolute,gauge,nopercent,noinfo
WithPeak[cputemp]: ymw
unscaled[cputemp]: dwmy
YLegend[cputemp]: Temperature
ShortLegend[cputemp]: C
LegendI[cputemp]: Core 0
LegendO[cputemp]: Core 1
Legend1[cputemp]: Core 0
Legend2[cputemp]: Core 1


### M/B Temperature ####
Target[mbtemp]: `/usr/bin/sensors | grep 'temp1' |
awk '{print $2}{print $2}' | sed -e 's/+//' -e 's/[^0-9+\.].*//'`
MaxBytes[mbtemp]: 100
Title[mbtemp]: M/B Temperature
PageTop[mbtemp]: <H1>M/B Temperature</H1>
Options[mbtemp]: growright,absolute,gauge,nopercent,noinfo
WithPeak[mbtemp]: ymw
unscaled[mbtemp]: dwmy
YLegend[mbtemp]: Temperature
ShortLegend[mbtemp]: C
LegendI[mbtemp]: Temp
LegendO[mbtemp]: Temp
Legend1[mbtemp]: M/B Temp
Legend2[mbtemp]: M/B Temp


前回 lm_sensors でCPU温度が取得できるようになった、今回は取得した温度をログに記録する。
lm_sensors を実行すると、下記のように表示される。
# sensors

acpitz-virtual-0
Adapter: Virtual device
temp1: +54.0°C (crit = +104.0°C)

coretemp-isa-0000
Adapter: ISA adapter
Core 0: +22.0°C (high = +80.0°C, crit = +100.0°C)
Core 1: +23.0°C (high = +80.0°C, crit = +100.0°C)


下記コマンドオプションを加えることで、温度(数値)だけ表示させることができる。
# /usr/bin/sensors | grep 'Core' |
awk '{print $3}' | sed -e 's/+//' -e 's/[^0-9+\.].*//'
22.0
23.0


M/B(Chipset)温度は、下記で取得。
# /usr/bin/sensors | grep 'temp1' |
awk '{print $2}{print $2}' | sed -e 's/+//' -e 's/[^0-9+\.].*//'
54.0
54.0


M/Bの温度取得については、MRTGの入力は2系統であるので、printで同じ値を2度出力している。


メモリーについては、freeコマンドで、メモリーとスワップの最大容量を確認して、それぞれ値を設定する。
# free
total used free shared buffers cached
Mem: 4010280 231876 3778404 0 12204 142772
-/+ buffers/cache: 76900 3933380
Swap: 6242296 0 6242296


保存したら、設定ファイルの文字コードをEUCに変換する。
設定ファイルのバックアップ
# cp /etc/mrtg/mrtg.cfg /etc/mrtg/mrtg.cfg.org

nkfでコードをEUCに変換
# nkf -e /etc/mrtg/mrtg.cfg.org > /etc/mrtg/mrtg.cfg


なお、nkfがインストールされてない場合は、nkfパッケージをインストール。
# yum install nkf


MRTGの起動スクリプトを作っておく

# vi mrtg.sh

#!/bin/bash

LOCK=/var/lock/mrtg/mrtg_l
CONFCACHE=/var/lib/mrtg/mrtg.ok

export LANG=ja_JP.eucJP
mrtg /etc/mrtg/mrtg.cfg --lock-file $LOCK --confcache-file $CONFCACHE


# chmod 700 mrtg.sh <- 権限の付加


外部からアクセスできるように許可をする
# vi /etc/httpd/conf.d/mrtg.conf

#Alias /mrtg /var/www/mrtg
Alias /mrtg /home/user/public_html/mrtg <- 変更する

<Location /mrtg>
Order deny,allow
Deny from all
Allow from All <-追加
#Allow from 127.0.0.1
Allow from ::1
# Allow from .example.com
</Location>


設定の反映
# /etc/rc.d/init.d/httpd restart
httpd を停止中: [ OK ]
httpd を起動中: [ OK ]


とりあえずALLとして、アクセス制御は .htaccess で行えばよい。

crondが起動していない場合は、起動または再起動させる。
# service crond restart
crond を停止中: [ OK ]
crond を起動中: [ OK ]


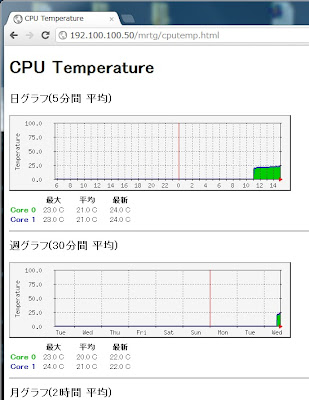
動作確認


それぞれのグラフは [SeverIP]/mrtg/[label].html でアクセスできる。
たとえば、CPU温度であれば、http://192.100.100.50/mrtg/cputemp.html
2012年3月26日月曜日

lm_sensorsのインストール

CPU温度を確認するため、lm_sensorsをインストールする。XS35V2はSSD仕様のため、ディスク(SSD)の温度は計測しない(シリコンだから、たぶん80℃までは大丈夫なのかな?)

# yum install lm_sensors

Loaded plugins: fastestmirror, presto
Loading mirror speeds from cached hostfile
* base: www.ftp.ne.jp
* extras: www.ftp.ne.jp
* updates: www.ftp.ne.jp
Setting up Install Process
Resolving Dependencies
--> Running transaction check
---> Package lm_sensors.i686 0:3.1.1-10.el6 will be installed
--> Finished Dependency Resolution

Dependencies Resolved

============================================================
Package Arch Version Repository Size
============================================================
Installing:
lm_sensors i686 3.1.1-10.el6 base 122 k

Transaction Summary
============================================================
Install 1 Package(s)

Total download size: 122 k
Installed size: 343 k
Is this ok [y/N]: y
Downloading Packages:
Setting up and reading Presto delta metadata
Processing delta metadata
Package(s) data still to download: 122 k
lm_sensors-3.1.1-10.el6.i686.rpm | 122 kB 00:00
Running rpm_check_debug
Running Transaction Test
Transaction Test Succeeded
Running Transaction
Installing : lm_sensors-3.1.1-10.el6.i686 1/1

Installed:
lm_sensors.i686 0:3.1.1-10.el6

Complete!


続いて設定、設定は下記コマンドで行う、質問は基本[Enter]で処理。

# sensors-detect

Stopping lm_sensors: not configured, run sensors-detect [警告]
# sensors-detect revision 1.1
# System: Standard XS35
# Board: Shuttle B10IE01

This program will help you determine which kernel modules you need
to load to use lm_sensors most effectively. It is generally safe
and recommended to accept the default answers to all questions,
unless you know what you're doing.

Some south bridges, CPUs or memory controllers contain embedded sensors.
Do you want to scan for them? This is totally safe. (YES/no):
Silicon Integrated Systems SIS5595... No
VIA VT82C686 Integrated Sensors... No
VIA VT8231 Integrated Sensors... No
AMD K8 thermal sensors... No
AMD Family 11h thermal sensors... No
Intel Core family thermal sensor... Success!
(driver `coretemp')
Intel AMB FB-DIMM thermal sensor... No
VIA C7 thermal and voltage sensors... No

Some Super I/O chips contain embedded sensors. We have to write to
standard I/O ports to probe them. This is usually safe.
Do you want to scan for Super I/O sensors? (YES/no):
Probing for Super-I/O at 0x2e/0x2f
Trying family `National Semiconductor'... No
Trying family `SMSC'... No
Trying family `VIA/Winbond/Nuvoton/Fintek'... No
Trying family `ITE'... No
Probing for Super-I/O at 0x4e/0x4f
Trying family `National Semiconductor'... Yes
Found unknown chip with ID 0x8500

Some systems (mainly servers) implement IPMI, a set of common interfaces
through which system health data may be retrieved, amongst other things.
We first try to get the information from SMBIOS. If we don't find it
there, we have to read from arbitrary I/O ports to probe for such
interfaces. This is normally safe. Do you want to scan for IPMI
interfaces? (YES/no):
Probing for `IPMI BMC KCS' at 0xca0... No
Probing for `IPMI BMC SMIC' at 0xca8... No

Some hardware monitoring chips are accessible through the ISA I/O ports.
We have to write to arbitrary I/O ports to probe them. This is usually
safe though. Yes, you do have ISA I/O ports even if you do not have any
ISA slots! Do you want to scan the ISA I/O ports? (YES/no):
Probing for `National Semiconductor LM78' at 0x290... No
Probing for `National Semiconductor LM79' at 0x290... No
Probing for `Winbond W83781D' at 0x290... No
Probing for `Winbond W83782D' at 0x290... No

Lastly, we can probe the I2C/SMBus adapters for connected hardware
monitoring devices. This is the most risky part, and while it works
reasonably well on most systems, it has been reported to cause trouble
on some systems.
Do you want to probe the I2C/SMBus adapters now? (YES/no):
Using driver `i2c-i801' for device 0000:00:1f.3: Intel 82801G ICH7
Module i2c-dev loaded successfully.

Next adapter: i915 gmbus disabled (i2c-0)
Do you want to scan it? (YES/no/selectively):

Next adapter: i915 gmbus ssc (i2c-1)
Do you want to scan it? (YES/no/selectively):

Next adapter: i915 GPIOB (i2c-2)
Do you want to scan it? (YES/no/selectively):

Next adapter: i915 gmbus vga (i2c-3)
Do you want to scan it? (YES/no/selectively):

Next adapter: i915 GPIOA (i2c-4)
Do you want to scan it? (YES/no/selectively):

Next adapter: i915 gmbus panel (i2c-5)
Do you want to scan it? (YES/no/selectively):

Next adapter: i915 GPIOC (i2c-6)
Do you want to scan it? (YES/no/selectively):

Next adapter: i915 gmbus dpc (i2c-7)
Do you want to scan it? (YES/no/selectively):

Next adapter: i915 GPIOD (i2c-8)
Do you want to scan it? (YES/no/selectively):

Next adapter: i915 gmbus dpb (i2c-9)
Do you want to scan it? (YES/no/selectively):

Next adapter: i915 GPIOE (i2c-10)
Do you want to scan it? (YES/no/selectively):

Next adapter: i915 gmbus reserved (i2c-11)
Do you want to scan it? (YES/no/selectively):

Next adapter: i915 gmbus dpd (i2c-12)
Do you want to scan it? (YES/no/selectively):

Next adapter: i915 GPIOF (i2c-13)
Do you want to scan it? (YES/no/selectively):

Next adapter: SMBus I801 adapter at 0400 (i2c-14)
Do you want to scan it? (YES/no/selectively):
Client found at address 0x50
Probing for `Analog Devices ADM1033'... No
Probing for `Analog Devices ADM1034'... No
Probing for `SPD EEPROM'... No
Probing for `EDID EEPROM'... No

Now follows a summary of the probes I have just done.
Just press ENTER to continue:

Driver `coretemp':
* Chip `Intel Core family thermal sensor' (confidence: 9)

Do you want to overwrite /etc/sysconfig/lm_sensors? (YES/no):
Starting lm_sensors: loading module coretemp [ OK ]
Unloading i2c-dev... OK


とりあえず、sensors を実行すると、次の値が出た。とりあえず、M/BとCPUの温度だけとれているようだ。

# sensors

acpitz-virtual-0
Adapter: Virtual device
temp1: +52.0°C (crit = +104.0°C)

coretemp-isa-0000
Adapter: ISA adapter
Core 0: +19.0°C (high = +80.0°C, crit = +100.0°C)
Core 1: +20.0°C (high = +80.0°C, crit = +100.0°C)


なお、lm-sensorsが対応していない場合は、下記URLからsensors-detectの最新版をダウンロードして実行。
http://dl.lm-sensors.org/lm-sensors/files/